Working on the exercise
Open the datavis_exercises folder in VSCode and open VSCode's terminal.
To view the instructions and work on the exercises you have to start a development
server using:
$: npm run devYou can now access your version of the website at localhost:3000. All the changes you make will be detected automatically and your site will update. Sometimes you may need to refresh the page to see a change happen.
To see a specific week's instructions, navigate to that week's page using the Exercises link in the site's header. For now, go to
localhost:3000/exercises/week_0. To work on the exercises, you will have to edit the files located in that
weeks folder. For example, finish exercise 1 of week 0 by changing src/routes/week_0/exercises/ex_1.svelte. The files are numbered by the exercise they belong to. Make sure to have a
working solution of each exercise when submit your work! Do not change any
other files unless the exercise instructions tell you to. If you do change
other files, you will run into merge issues when you try to update your
repository with new instructions.
When you are done with the exercises of a given week, you have to submit your work by:
Tell git which files have changed. First, click the source control button in the left side-bar. Then, click the plus icon in the changes header to include all files that have changed (the plus icon only shows up if you hover over the header). If you only want to include a couple of specific files, you can also click the pluses on those files instead.
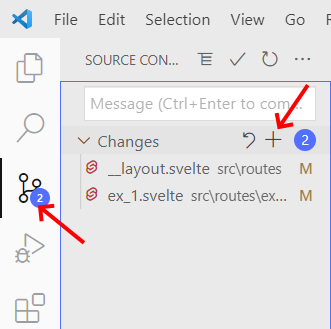
Stage changed files
Commit your changes. First, type a message in the text-box. Then, click the check-mark icon to create the commit.
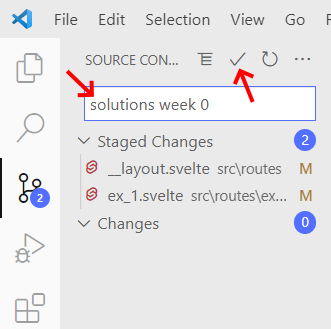
Commit your changes
Push your changes to GitLab by clicking the sync button. You will get a pop-up to fill in your gitlab credentials.
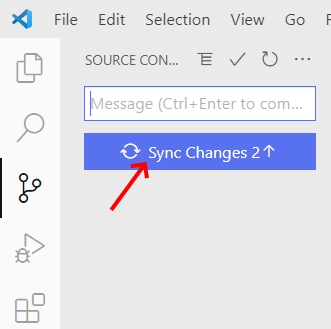
Push your commits
The number in the button indicates the number of commits you have created that are not yet pushed. Technically, the sync operation in VSCode first performs a pull and then a push. So, any changes someone else made to the repository after the last time you synced will also be downloaded. This can lead to merge errors if they changed the same lines of a file as you did. But this will only happen if you collaborate on the same repository with multiple people.
- Important! Verify that your solutions work on Vercel! Go to
your website's dashboard on Vercel and check that it finished building. That
should take less than a minute. Make sure that vercel did not report any
errors. Then, check that your published website
https://[username]-datavis-exercises.vercel.apphas updated and all your changes show up as expected. We will use your website on Vercel for grading, so all your work has to show up there! - Go to Blackboard / Toledo and upload a
.ziparchive of your code in that week's assignment to indicate that you have completed it. We will use your code submitted on Blackboard / Toledo as ground truth in cases of doubt. Please exclude thenode_modulesfolder from the.ziparchive.
Receiving new instructions
Each week we will release new exercises on our repository. To access them in your own fork, you have to merge the new release. You can do that by following the steps in the images below. Make sure you have committed all your changes before you run these commands!
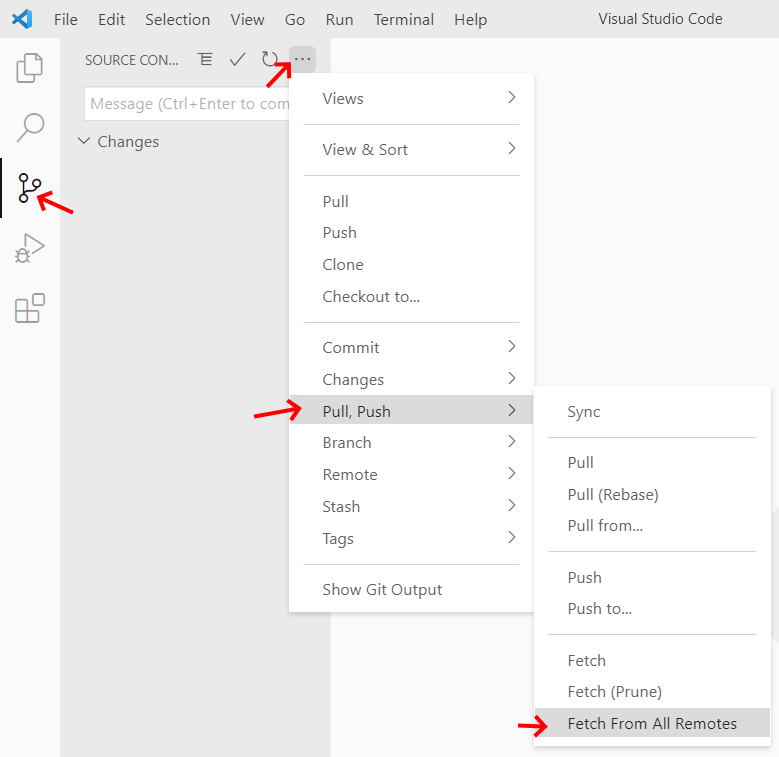
1. Fetch from all remotes
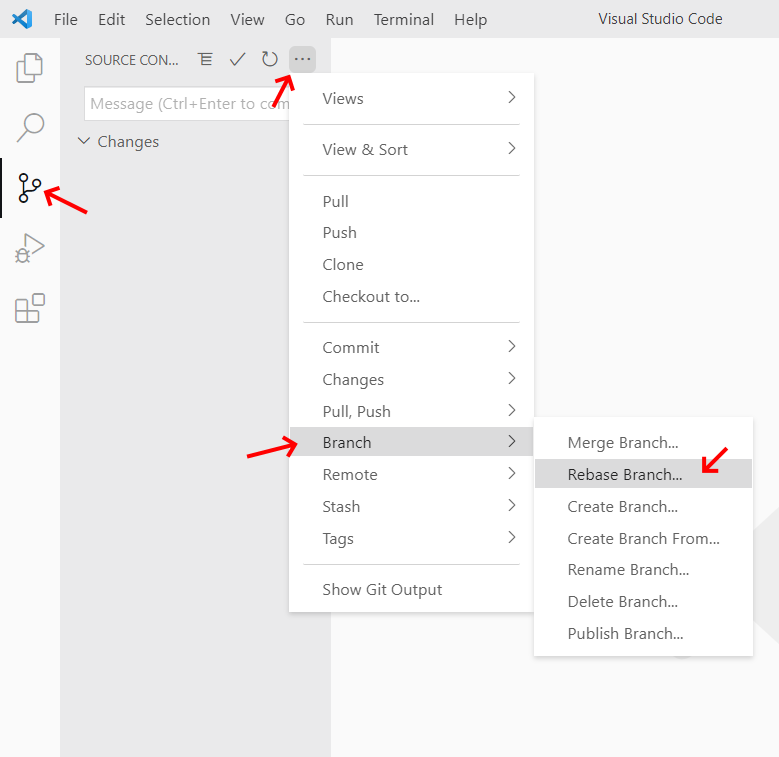
2. Start rebasing the update
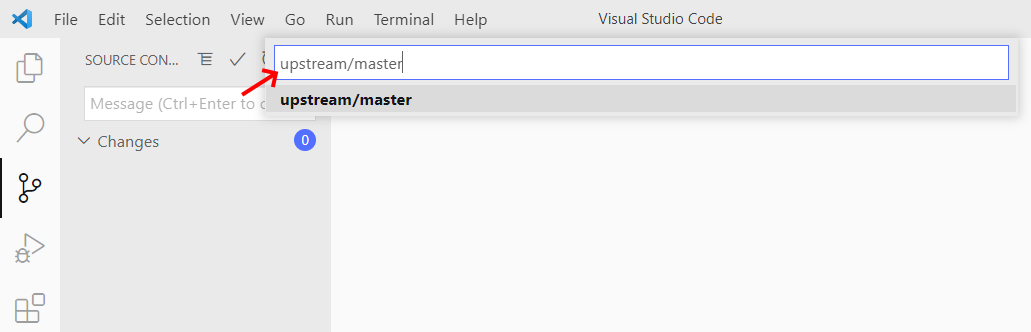
3. Specify branch: upstream/master
If you have edited files other than the ones we mention in the exercises, it
can occur that git runs into conflicts when it is applying the update. In that
case, you have to manually edit the files that are in conflict. After you have
solved all conflicts continue the rebase process by running : git rebase --continue in the terminal. VSCode will now open a new editor with a commit message. Simply
type a message in it, save the file and close the editor tab. Git should automatically
continue after you close the file.
After you have updated your repository with our new release, you have to push the changes to GitLab with force because we have essentially rewritten the history of your repository with the update. To do this, follow the steps in the image below:
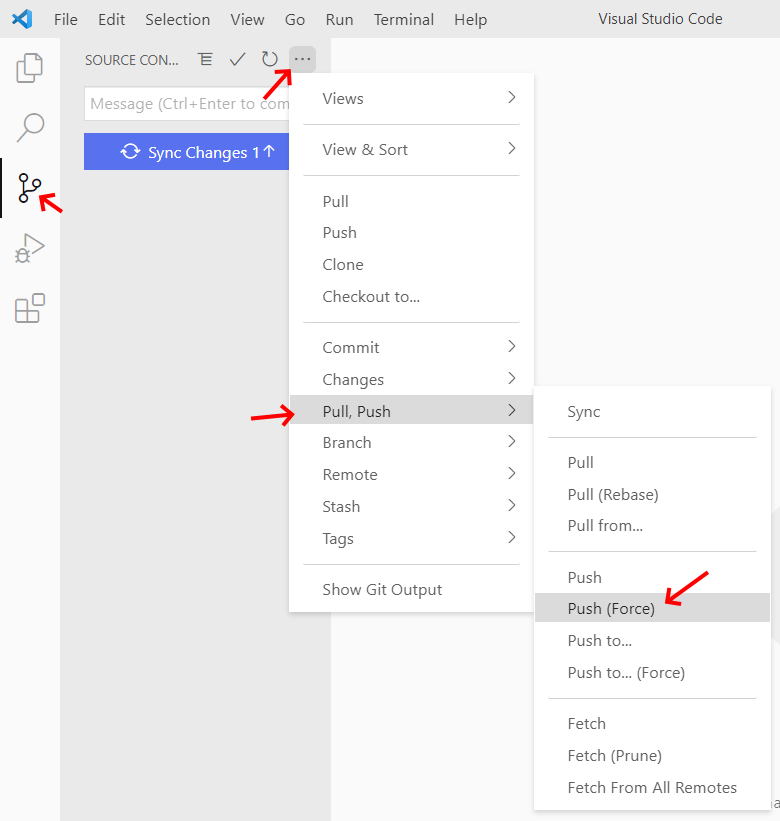
Push with force
The end
You should now:
- Be able to locate and change the exercise files.
- Be able to commit and publish your work.
- Be able to update your site with new instructions when we release them.
Important! Complete the first assignment on Blackboard /
Toledo by submitting the URLs to your GitLab repository and Vercel page and a .zip archive of your code!